Author Archives Nabil Kherouf

About Nabil Kherouf

Enthusiastic software engineer and lead guitarist. I've been with Mill Creek systems, Inc since 2011. My main focus when developing software is using Computational Geometry and AI in finding optimal solutions to problems in different industries.

Calling C# code from Excel VBA

Posted by Nabil Kherouf
on November 8, 2024
Comments Off on Calling C# code from Excel VBA

Calling C# Code from VBA

Do you have code written in C# that you want to invoke in Excel VBA? In order to be able to achieve this, you will have to expose your C# code to COM (Component Object Model). COM is a platform-independent, object-oriented system for creating binary software components that can interact. COM objects can be created in a variety of languages and can be invoked from within any programming language that supports COM. We will show you in this post how to create a C# COM-visible class and invoke it within Excel VBA project.

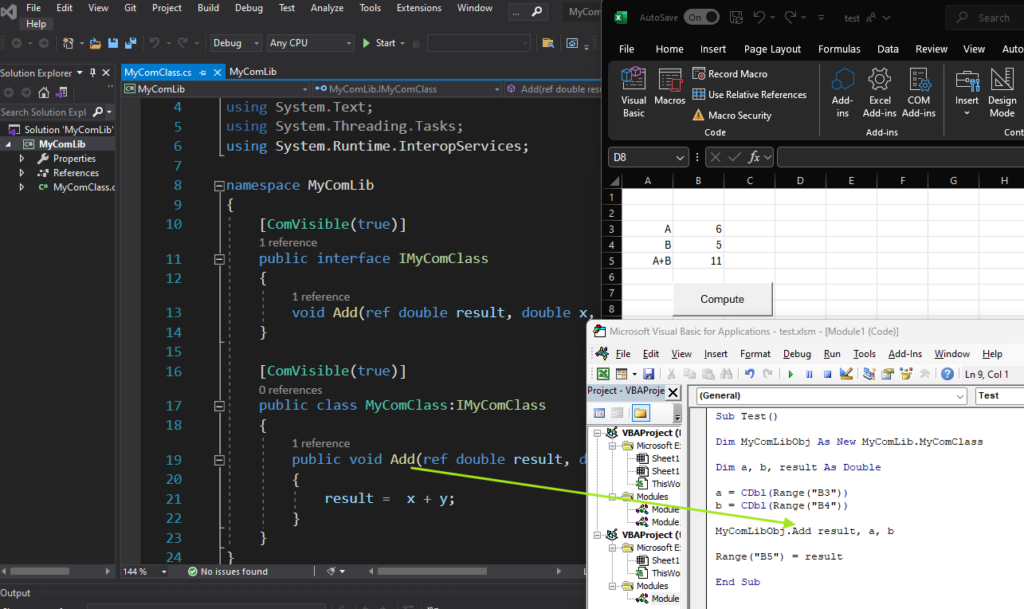
Using a C# COM-visible class in Excel VBA

Creating a COM-visible Assembly in C#.NET

We will use Visual Studio 2019, .NET Framework 4.8.1 and Microsoft® Excel® 64-bit in this post. Other versions of Visual Studio should also work with no issues as long as the .NET Framework is set to a version lower than 5.0 as support for COM was suspended in .NET Framework 5.0.

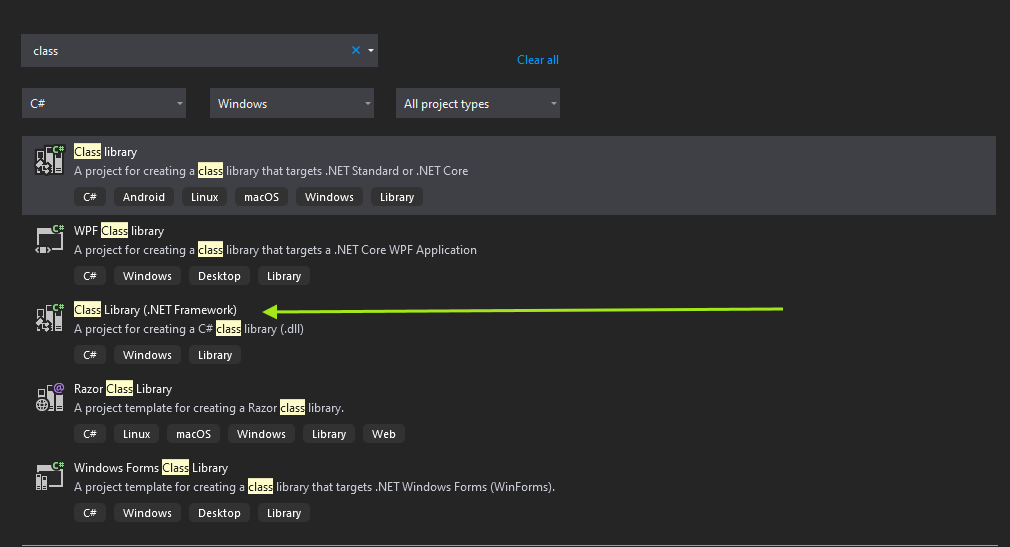
1- Open Visual Studio 2019 as Administrator and click on Create a new project then select C# Class Library (.NET Framework) from the menu. Make sure you select Class Library (.NET Framework) and not Class Library.

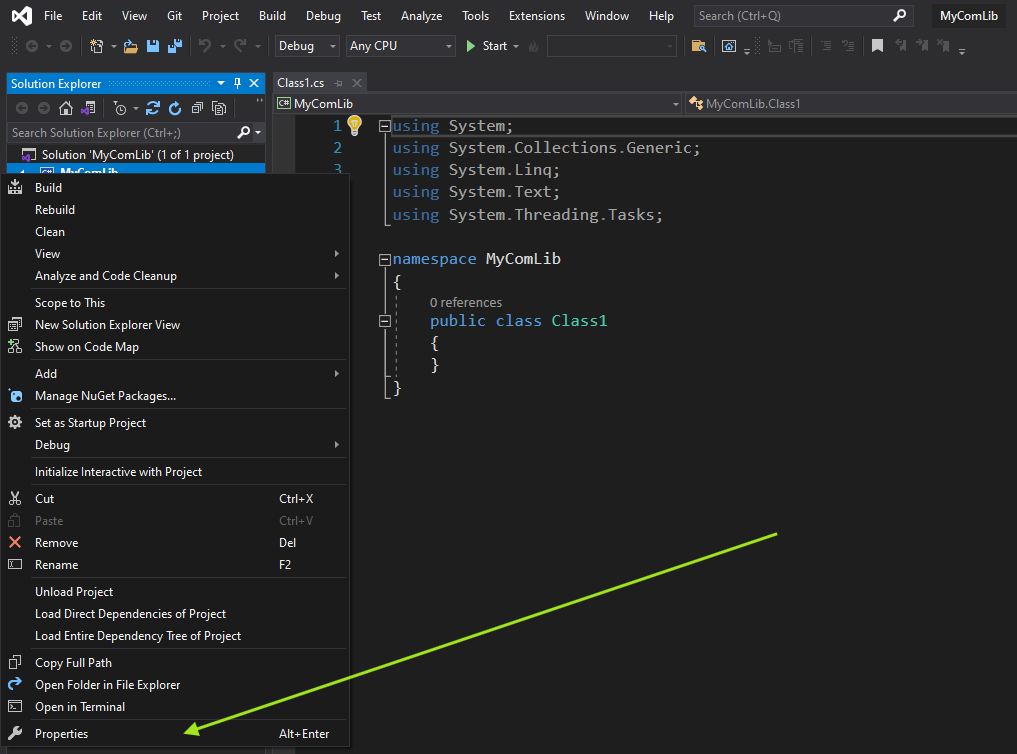
2- Right-click on your project in the Solution Explorer, then go to Properties.

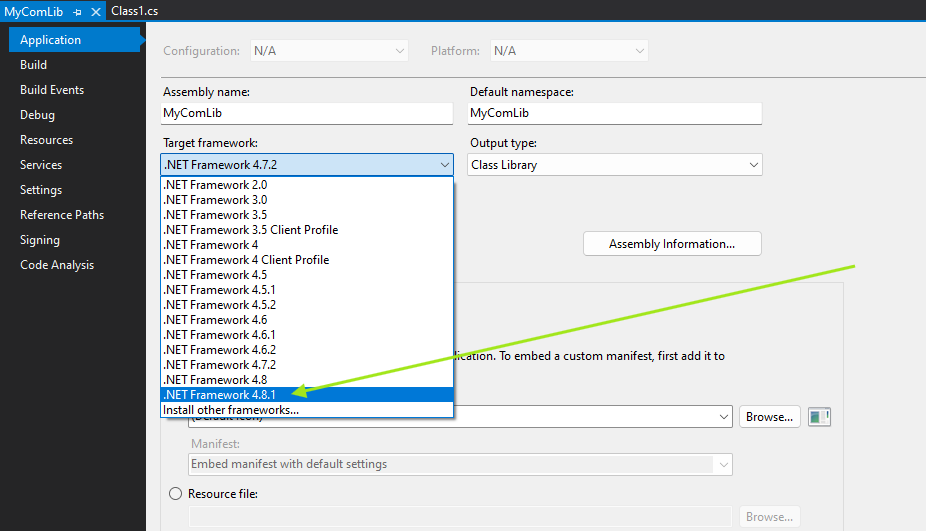
3- Under the Application section, change Target Platform to .NET Framework 4.8.1.

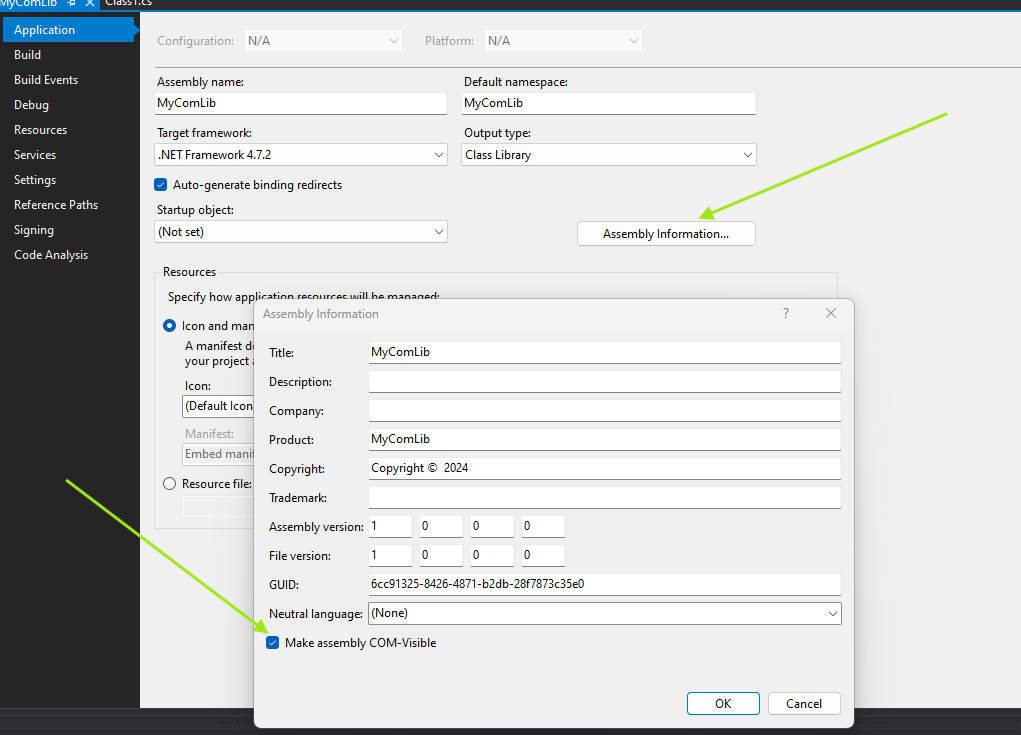
4- Click on Assembly Information and check Make assembly COM-visible. This makes all public types in the library COM-visible. We will show below how to hide types that you wouldn’t want to expose to COM.

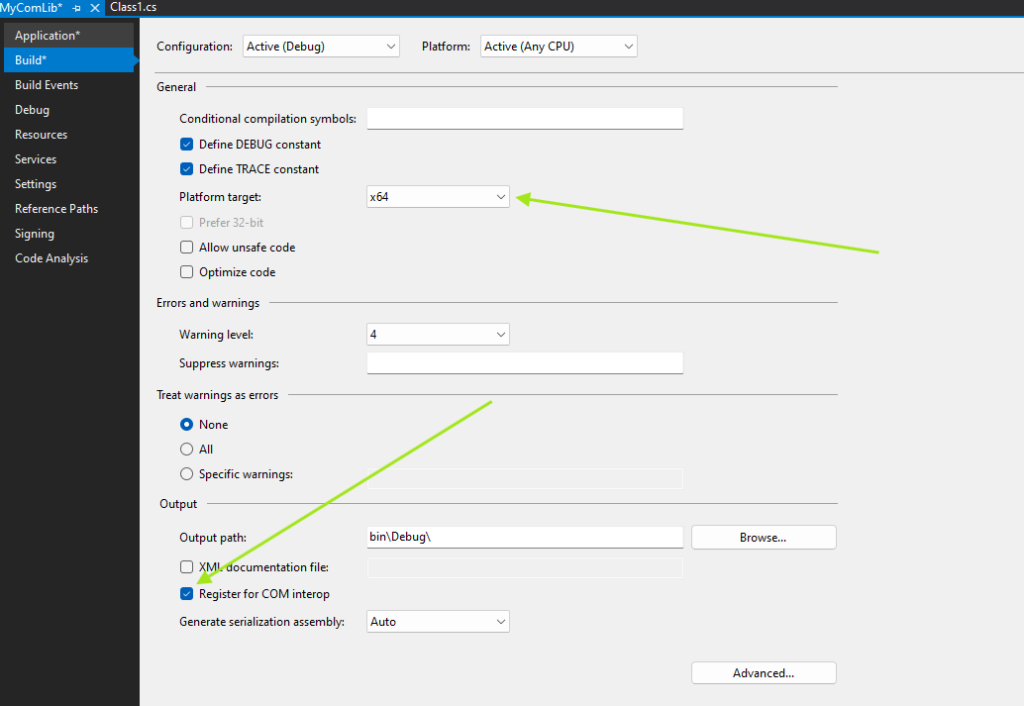
5- Then go to the Build section, change Platform target to x64 and click on Register for COM interop.

This option allows Visual Studio to register the dll on your machine and generate keys in HKEY_CLASSES_ROOT in the Registry. If this option is left unchecked, you will have to register the dll manually using the following command:

"C:\Windows\Microsoft.NET\Framework64\v4.0.30319\RegAsm.exe" /codebase "…\MyComLib.dll"

6- Rename Class1.cs to MyComClass.cs, add following code to your MyComClass.cs file.

using System;
using System.Collections.Generic;
using System.Linq;
using System.Text;
using System.Threading.Tasks;
using System.Runtime.InteropServices;

namespace MyComLib
{
    [ComVisible(true)]
    public interface IMyComClass
    {
        void Add(ref double result, double x, double y);
    }

    [ComVisible(true)]
    public class MyComClass:IMyComClass
    {
        public void Add(ref double result, double x, double y)
        {
            result =  x + y;
        }
    }
}

Please note the [ComVisible(true)] attribute before the name of the MyComClass class and IMyComClass interface. It’s the attribute that allows you to expose or hide a certain object to COM. If you have a particular object that you don’t want to expose, simply set this attribute to false.

7- Rebuild the solution. If you encounter the following error, make sure you re-run VS2019 as Administrator

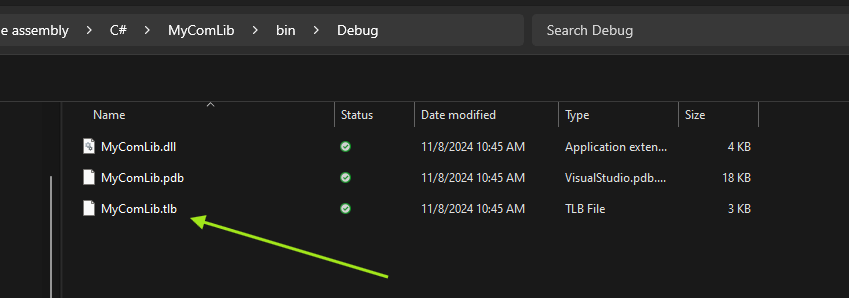
At this point, we have created a COM-visible assembly that Visual Studio automatically registers on the user’s machine. If you look under your bin\debug folder in Windows Explorer, you will see that a .tlb (type library) file got created after Visual Studio registered the assembly on your machine.

Calling a COM-visible class in Excel VBA

1- Open Excel and create a new blank workbook, then go to Developer>Visual Basic

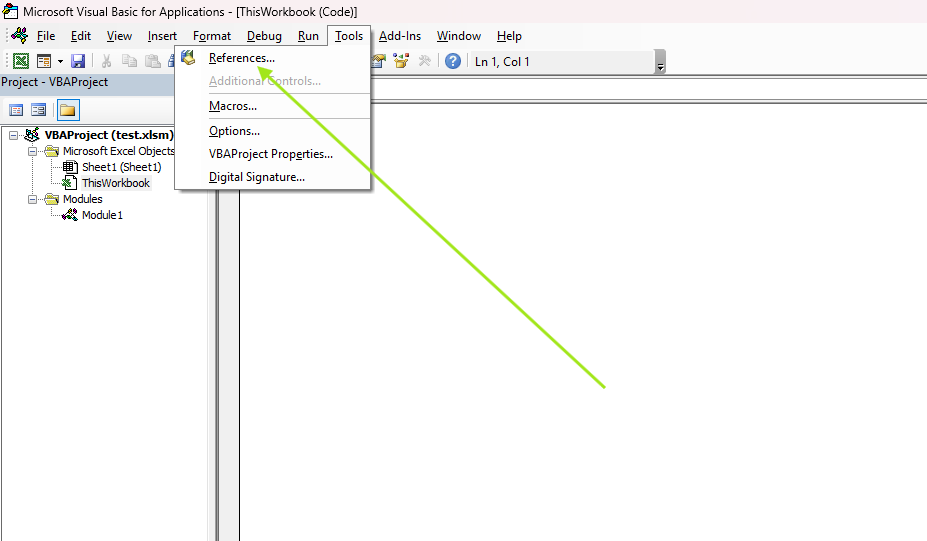
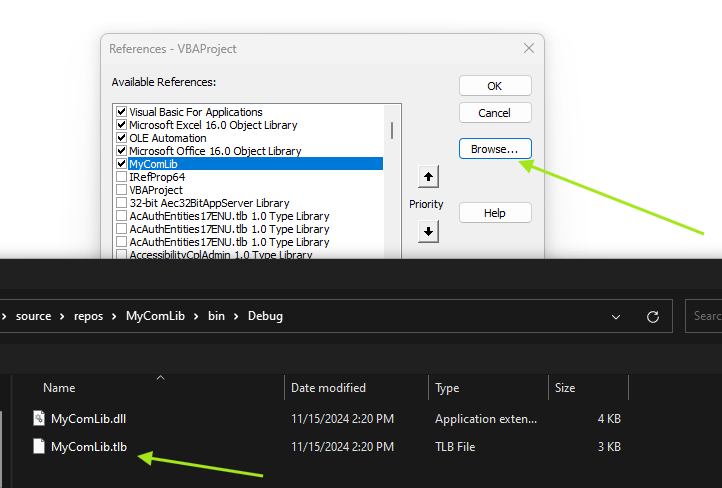
2- In the Visual Basic editor go to Tools->References then browse to the Debug folder where .tlb file is and add it.

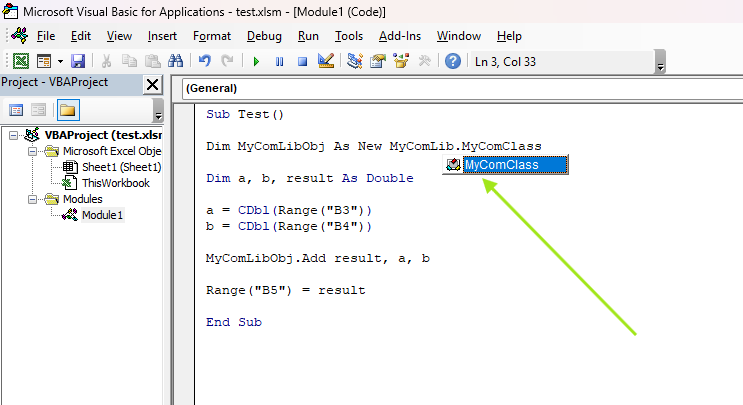
3- Add a module to your VBA project and add the following code

Sub Test()

Dim MyComLibObj As New MyComLib.MyComClass

Dim result As Double

MyComLibObj.Add result, 1#, 2#

Debug.Print result

End Sub

In order to be able to use our COM-visible class in Excel VBA, we have to create an instance of our MyComClass as shown at line 2 in the code above. Please note that MyComlib is the name the tlb/dll file.

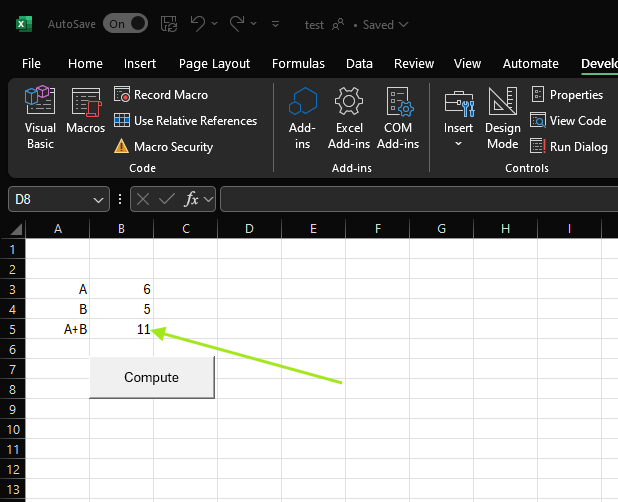
Here’s the output from our method MyComClass.Add in the immediate Window:

Contact us! Continue Reading

Using Voronoi Diagrams to Equally Divide/Allocate Adjoining Space Between Polygons

Posted by Nabil Kherouf
on October 28, 2024
Comments Off on Using Voronoi Diagrams to Equally Divide/Allocate Adjoining Space Between Polygons

Using Voronoi Diagrams to Equally
Divide/Allocate Adjoining Space Between Polygons

Problem description

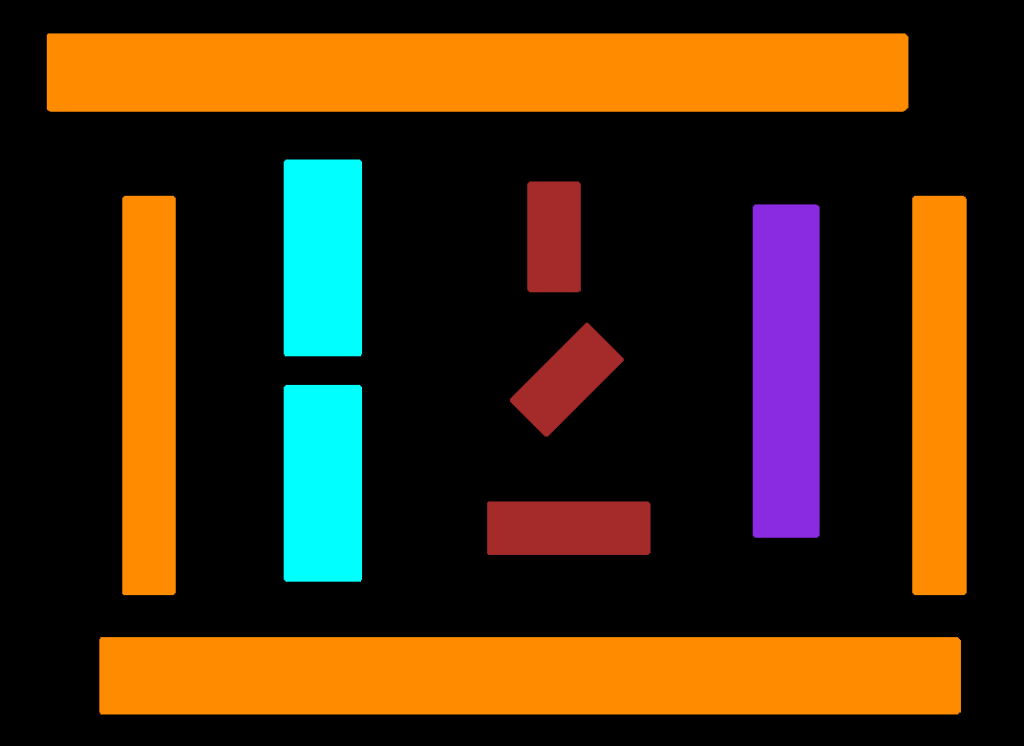
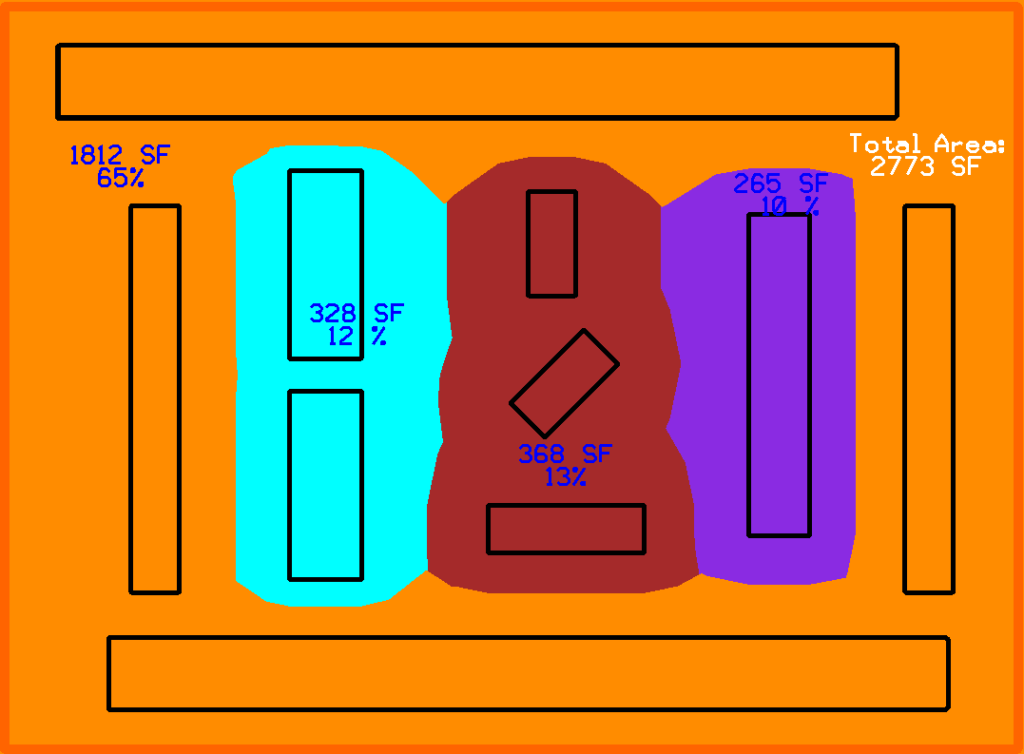
Given a set of arbitrary polygons belonging to different categories, we want to equally divide the space between polygons and compute the square footage of each category. For example, given different categories of machines on a factory floor; for each category, we need to sum up the area of each machine outline and its buffer zone on the factory floor.

The following images show a set of polygons in different color-coded categories.

Arbitrary polygons with different color-coded categories.
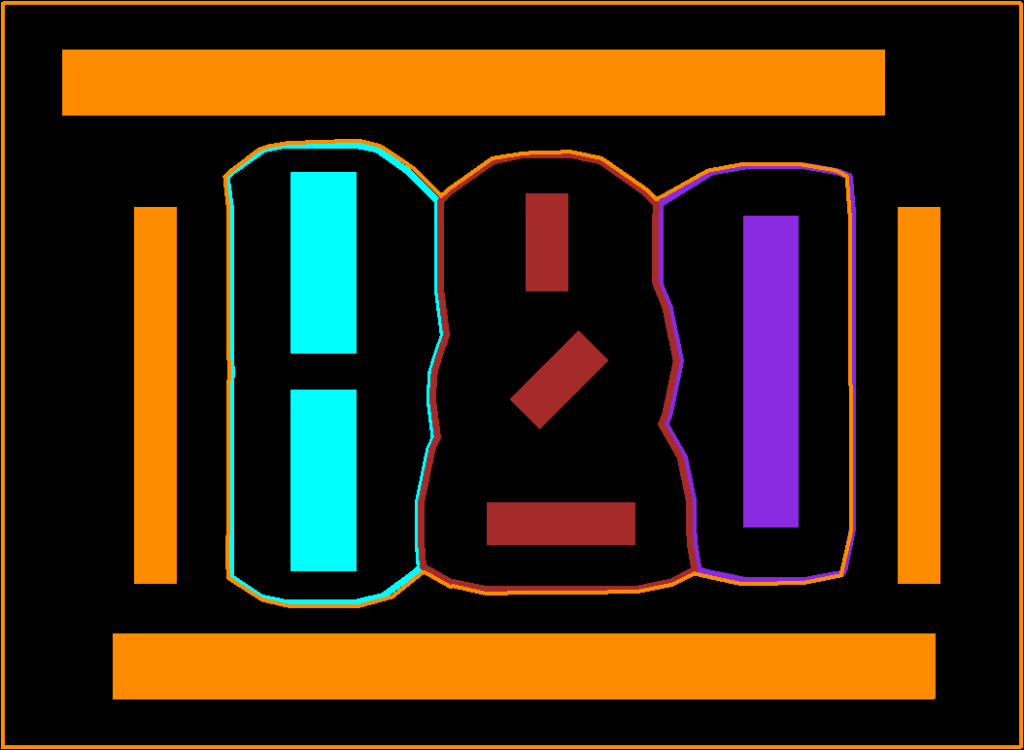
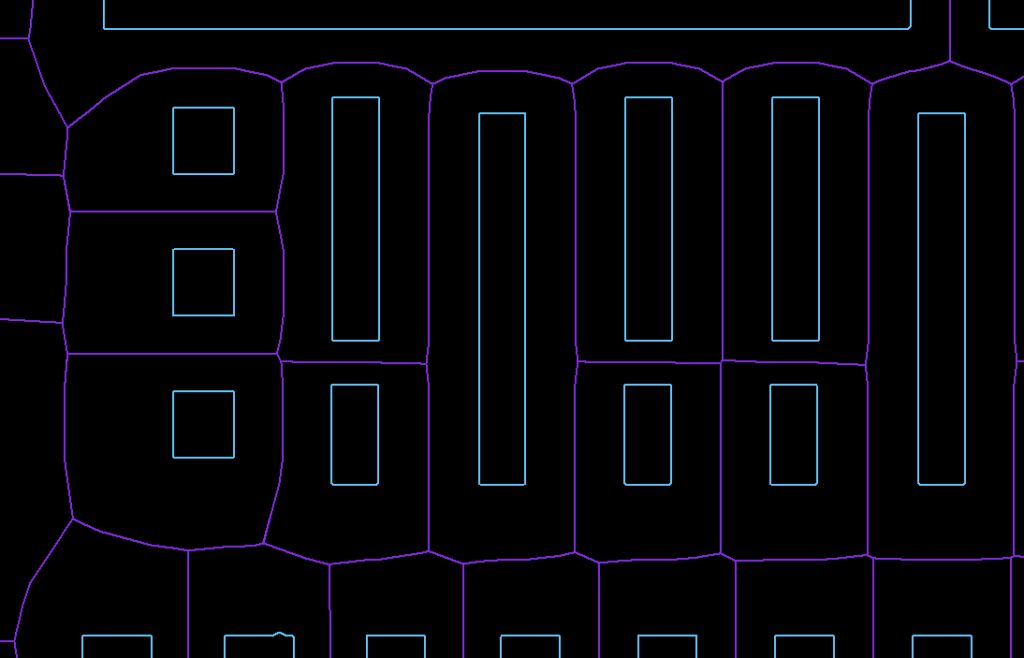
Desired buffer polygons for each category.
Square footage of each category by percent of total area.

Introduction

We tried several approaches to compute the square footage including expanding the polygons until they intersect with each other and sending rays outward from each polygon to find its neighbors to compute the midpoints between polygons. Neither approach was successful. We needed an algorithm to find the buffer zone for each polygon in such a way that the space is equally divided between any two adjacent polygons. The question is how to computationally divide space occupied by an arbitrary polygon and its neighbors?

How to divide space between a set of polygons

To divide the between polygons, we found a concept in Computational Geometry called Voronoi Diagrams to find the set of midpoints between each polygons and its neighbors. We were able to use the Voronoi cells from each polygon diagram to construct center-lines between all polygons. This allows us to easily divide/allocate the area from each polygon but category.

Equally divided space between polygons

Voronoi Diagrams

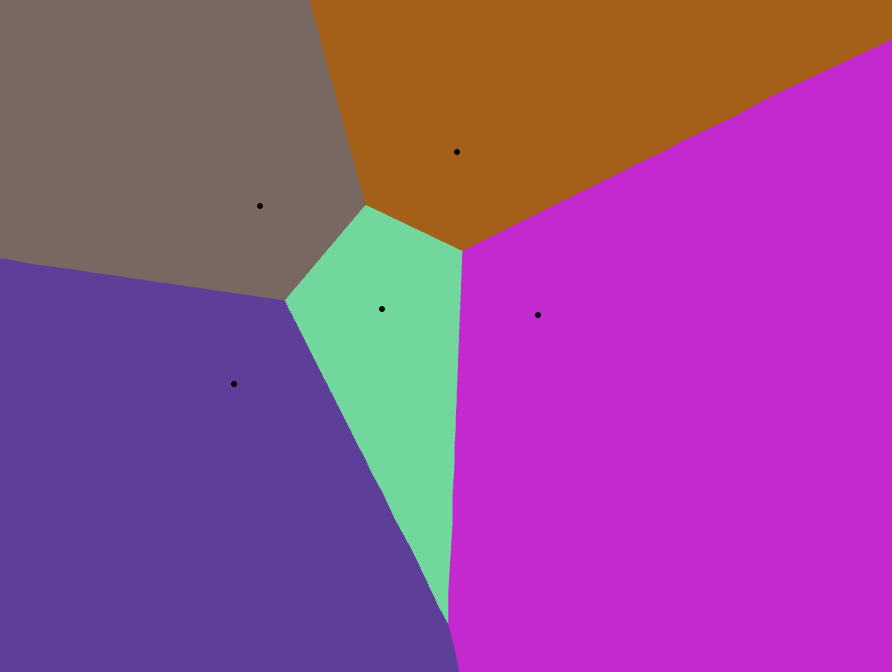
The simplest definition of Voronoi Diagrams is it being the partition of a plane into a set of regions close to each of a set of objects. In other words, given a set of points in a plane, a Voronoi region/cell of a point A is an area encompassing points closer to A than any other points in the plane. To use Voronoi Diagrams with a set of polygons, we need to compute a cell for each segment of a given polygon. By performing a union on the resulting Voronoi cells, we find the center lines between the polygon and its neighbors (See example below).

Following image shows a Voronoi cell for each segment with matching colors:

Voronoi Cells/Segments with matching colors

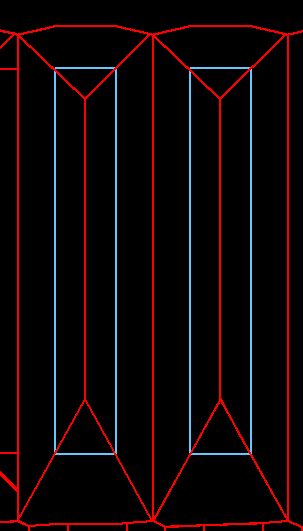
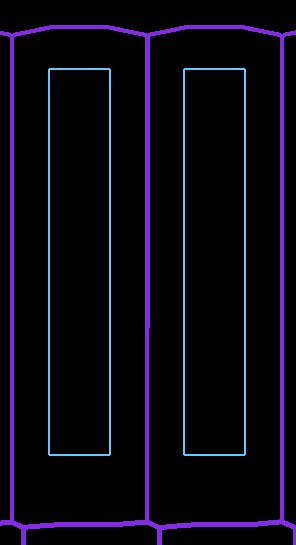
Following images show the Voronoi cells (in red) for the segments of two adjacent polygons and the final centerlines in purple after performing the union of the Voronoi cells:

All Voronoi Cells (in red) for each
polygons
Centerlines (in purple) after union
of Voronoi Cells

Step-by-step process of finding the centerlines

  • For each polygon, extract segments and assign them an id to associate them with their original polygon.
  • Use Boost Geometry Library to compute Voronoi cells for each segment
  • Identify all segments of the same polygon and perform a boolean union of the cells associated with them.

The Boost Library provides a very efficient and easy-to-use function to compute the Voronoi Diagrams of any set of non-intersecting segments (except endpoints of consecutive segments). By passing the segments of each polygon to the Boost Library, we’re computing the Voronoi cell for each segment then we’re performing a boolean union of all resulting Voronoi cells. As mentioned before, the union will be a shape representing the centerlines between the polygon and its direct neighbors.

Please note that in the following C++ example, our polygons are stored in a collection called vPolygons. Also, segments are instances of the Segment_vd class which takes the coordinates of the segment endpoints and the index of the containing polygon as inputs to the constructor.

 // building a collection of segments from each polygon 
 // for each polygon
	for (unsigned index_polygon=0; index_polygon<vPolygons.size(); index_polygon++)
	{
		Polygon poly = vPolygons[index_polygon];

   // for each segment in current polygon
		for (int i=0; i< poly.numPnts; i++)
		{
			int curr = i, next = i==poly.numPnts-1?0:i+1;
			DPoint3d currP=poly.shapePnts[curr];
			DPoint3d nextP=poly.shapePnts[next];
    
      // add segment to collection with id = index_polygon
			segments.push_back(Segment_vd(currP.x, currP.y, nextP.x, nextP.y, index_polygon));	
		}
	}

	// Construction of the Voronoi Diagram.
	voronoi_diagram<double> vd;
	construct_voronoi(points.begin(), points.end(), segments.begin(), segments.end(),	&vd);
	

Conclusion

As shown above, Voronoi Diagrams were very essential in resolving our problem of area contribution by generating the midpoints between the polygons. Other applications for Voronoi Diagrams can also be found in various areas of study including indoor/outdoor navigation, robot motion, 3D Graphics, health, engineering and even natural sciences.

Helpful links:

Boost Library: https://www.boost.org

Voronoi Diagrams Tutorial from Boost Geometry Library: https://www.boost.org/doc/libs/1_80_0/libs/polygon/doc/voronoi_diagram.htm

Interactive Voronoi Diagram Generator: https://alexbeutel.com/webgl/voronoi.html

Wolfrom Definition of Voronoi Diagrams: https://mathworld.wolfram.com/VoronoiDiagram.html

Contact us!

Continue Reading

Collision detection inside CAD files

Posted by Nabil Kherouf
on October 28, 2024
Comments Off on Collision detection inside CAD files

Using Collision Detection to Place Non-Intersecting Items in a CAD file

Problem Description

For legibility and presentation purposes, we would like to programmatically append a descriptive label to an item in a CAD file in such a way that it doesn’t collide with the any preexisting labels/items.

Illustrative Example

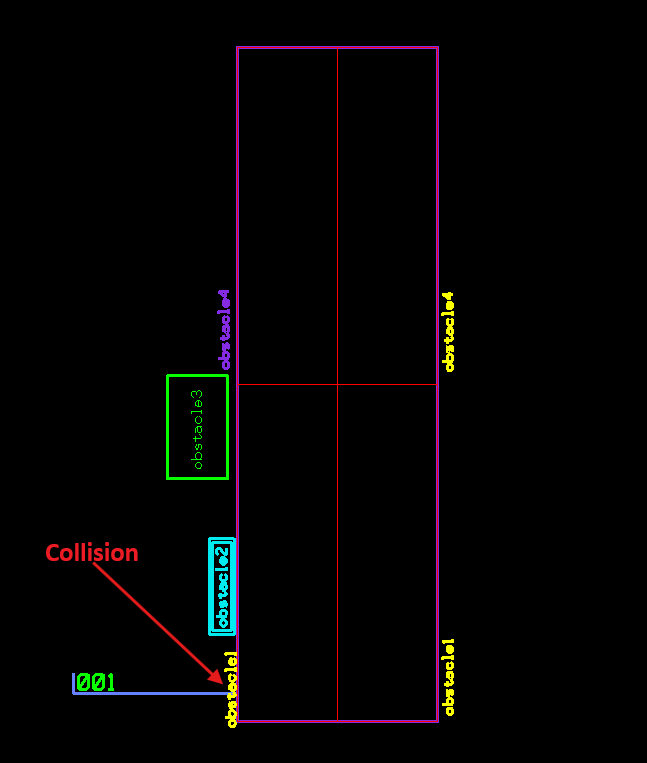
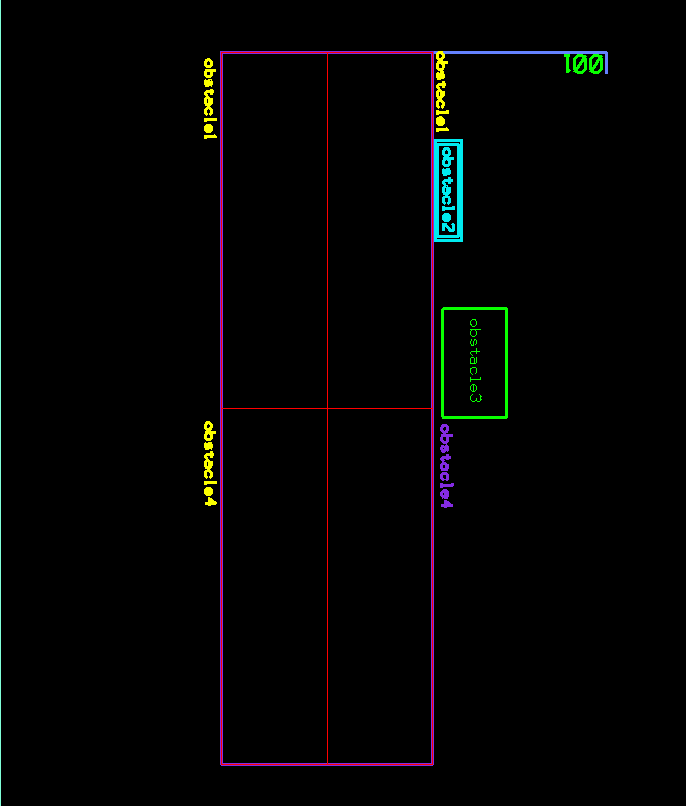
Given a CAD drawing of a set of cells with multiple labels placed on the side. Programmatically place a new label “001” without intersecting any existing labels/objects. See images below.

Collision between the “001” label and obstacle1

“001” Label intersecting “obstacle1”

No collision between the “001” label and existing obstacles

“001” label placed in a collision-free manner.

Introduction

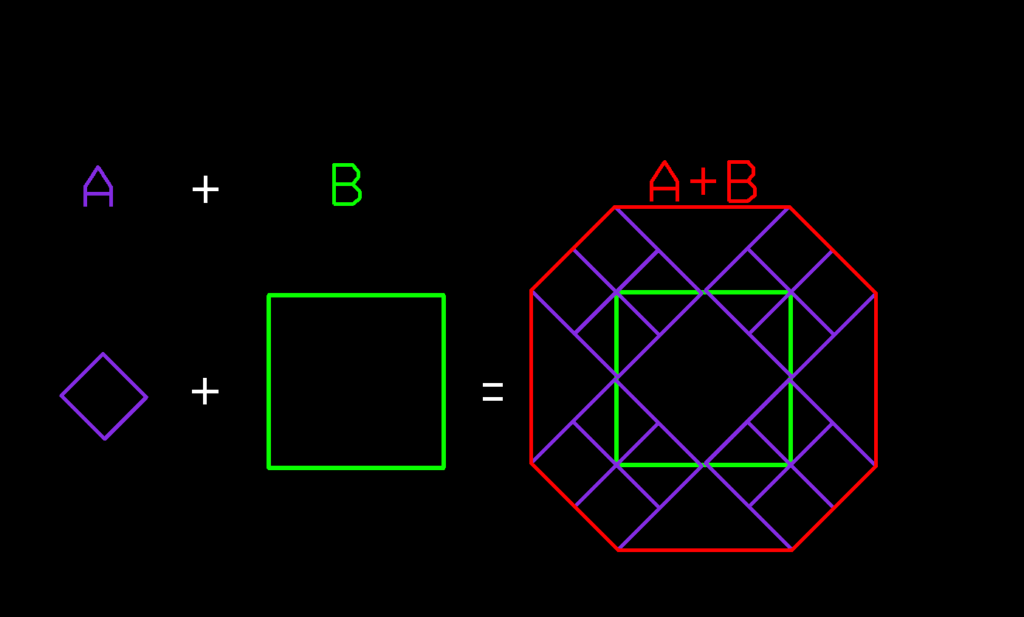
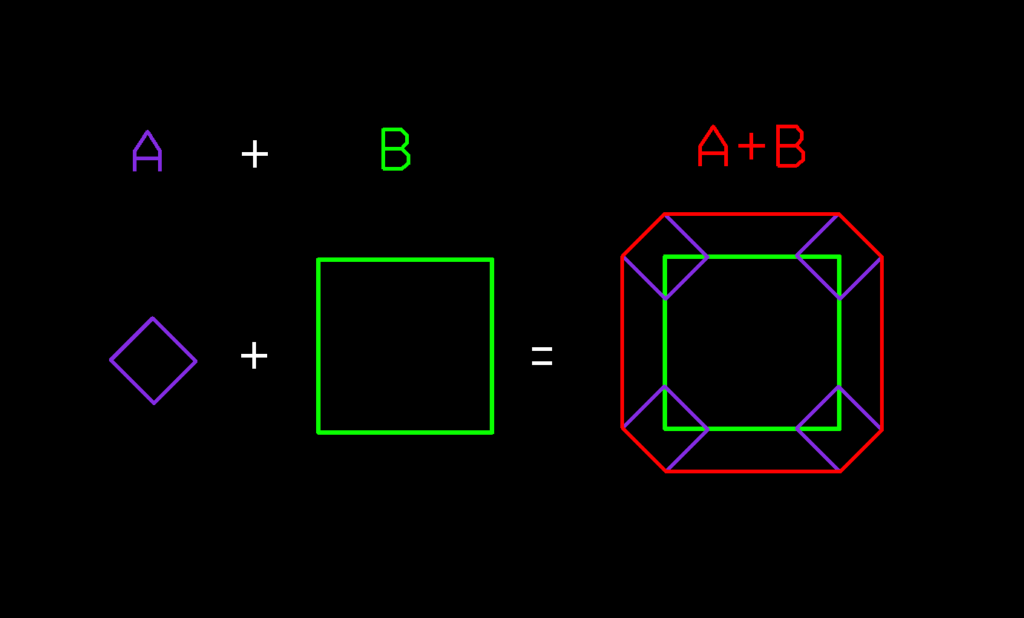
To achieve a collision-free placement of the new label for the example above, we’re using a concept in Computational Geometry called Minkowski Sums. The concept of Minkowski Sums of two polygons is defined as a set of points extracted by summing all pairs of points from the 2 polygons.

After creating a concave hull (C.H) for each obstacle and the new label, we’re convolving the C.H of the new label with the C.H of each obstacle at 0,0 origin and 180°. The result of the convolution will represent the collision space for each obstacle and the new label can be placed anywhere outside of the collision space.

Computing the collision-free space for the “001” label in the example above

Summary of the computation steps:

  • Extract the main placement line
  • Compute Minkowski Sums between label and obstacles at 0,0 org and at 180°
  • Clip the resulting polygons from Minkowski Sums from the main placement line

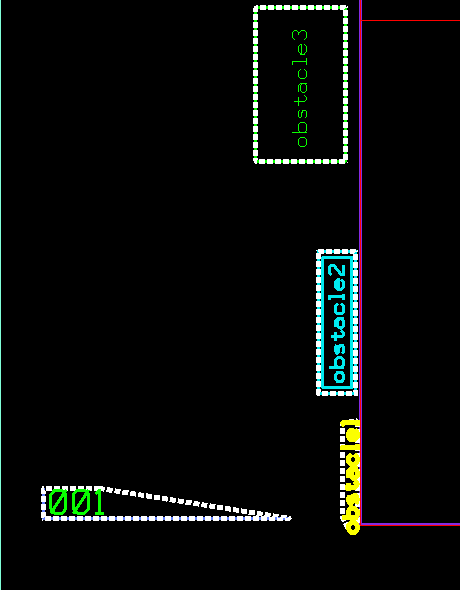
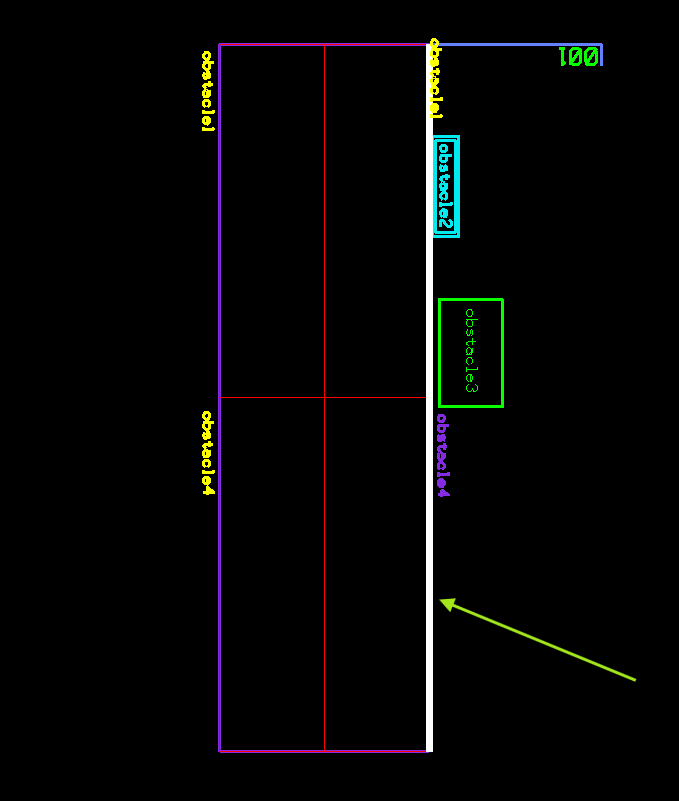
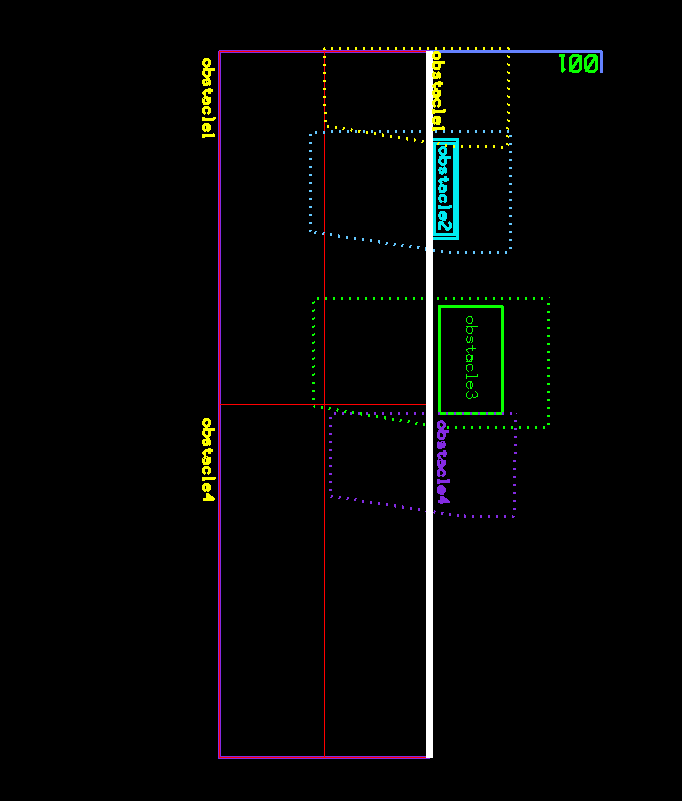
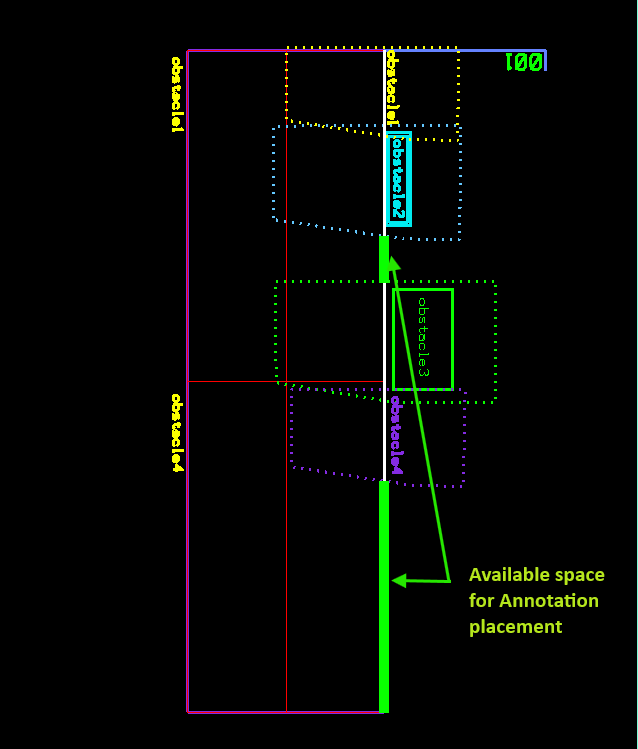
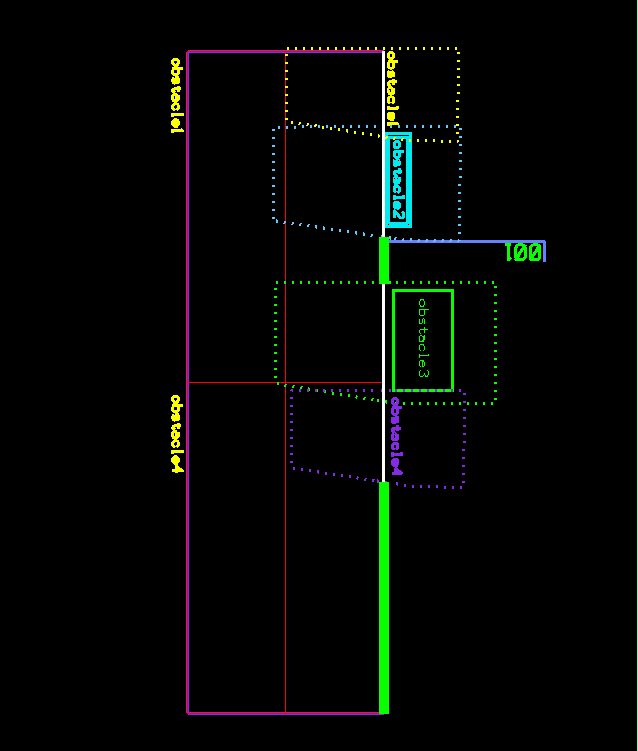
First step is to extract the main placement line (shown in white below) that represents all possible placement points, with or without collision with any existing objects. Next step is to compute the Minkowski Sums of the “001” label with each obstacle at zero origin and at 180°. Results are shown in dashed polygons in the image below. As explained before, the resulting shapes represent the collision space therefore they need to be clipped out of the main placement line (white line). All the other points on the main placement line will be valid candidates for collision-free placement. For simplicity, we will pick the point closest to beginning of the side line.

Main placement line shown in White

Main placement line shown in white. This represents all placement points with or without collision

Dashed polygons representing Minkowski Sums of label and each obstacle

Dashed polygons being the Minkowski Sums of label and each obstacle

Collision-free space shown in blue

All possible collision-free placement points on the 2 blue segments

Placement of label on collision-free space

“001” label placed on first valid collision-free point

Sample code

/***************************************
  Descr: Returns the Minkowski Sums between a robot and and set of obstacles
****************************************/
int mcs_minkowskiSums 
(
 VecMsPoints			vRobotPts,		//  => flag hull pts [MU]
 vector<VecMsPoints>	vvObstaclePts,  //  => obstacle pts [MU]
 vector<VecMsPoints>&	rvvMinSums		// <= 
)
{
	polygon_set a, b, c;
	polygon poly;
	std::vector<point> pts_robot;

	removeObstacleIntersections(vvObstaclePts);

  // Convert robot points to UORs only necessary if you're using MDL (Bentley uStation)
	int index =0;
	for each (DPoint3d pt in vRobotPts) // convert to UORs
	{
		DPoint3d	dPt;
		Point3d		iPt;
		
		dPt.x = mdlCnv_masterUnitsToUors(pt.x);
		dPt.y = mdlCnv_masterUnitsToUors(pt.y);
		dPt.z = 0.0;

		mdlCnv_DPointToIPoint (&iPt, &dPt); 
		pts_robot.push_back(point(iPt.x,iPt.y));
	}

	boost::polygon::set_points(poly, pts_robot.begin(), pts_robot.end());
	//boost::geometry::correct(poly);
	poly.size();
	a += poly;

	for each (VecMsPoints vObstaclePts in vvObstaclePts)
	{
	  // Convert obtscale points to UORs. ** only necessary if you're using MDL (Bentley uStation)
		polygon poly1;
		std::vector<point> pts;
		for each (DPoint3d pt in vObstaclePts) // convert to UORs and * -1 for Mink Diff
		{
			DPoint3d	dPt;
			Point3d		iPt;
			
			dPt.x = mdlCnv_masterUnitsToUors(pt.x) * -1.0;
			dPt.y = mdlCnv_masterUnitsToUors(pt.y) * -1.0;
			dPt.z = 0.0;

			mdlCnv_DPointToIPoint (&iPt, &dPt); 
			
			pts.push_back(point(iPt.x,iPt.y));
		}

		boost::polygon::set_points(poly1, pts.begin(), pts.end());
		//boost::geometry::correct(poly1);
		poly1.size();
		b += poly1;
	}

	convolve_two_polygon_sets(c, a, b); // From Boost

	if (c.size() == 0)
		return FALSE;
	if (c.empty())
		return FALSE;

	//printf("\n BEFORE SIMPLE POLYGONS");
	//SimplePolygons simplePolygons;
	using namespace boost::polygon;
	vector<polygon> resultPolygons;
	c.get(resultPolygons);
	
	//for each(SimplePolygon poly in simplePolygons)
	for each(polygon poly in resultPolygons)
		rvvMinSums.push_back(mcs_get_points_poly(begin_points(poly), end_points(poly)));
	
	return TRUE;
}

Conclusion

We have shown in this post how to automatically add a new item to a CAD file without collision with existing items. We used Minkowski Sums for obstacle detection in a CAD file . The application of this concept can however extend beyond CAD/Collision Detection and can be used in numerous other fields such as robot motion, 3D modeling, … etc

Contact us!

Helpful links:

https://cp-algorithms.com/geometry/minkowski.html

https://www.geeksforgeeks.org/what-is-computational-geometry-and-how-is-it-applied-in-solving-geometric-problems

https://www.boost.org/doc/libs/develop/libs/polygon/doc/gtl_minkowski_tutorial.htm

Continue Reading
MENU